728x90

https://filezilla-project.org/

파일따운 후 설치


USER 그룹 만들고, 마운트할 가상경로와 실제경로를 지정한다.

가상경로 앞에는 /로 시작해야한다.


예를들어 

가상경로를 /order

실제경로를 C:\Users\cesar\OneDrive\바탕 화면


이렇게 지정하면 /orders로 들어오면 C....\바탕화면으로 연결된다.


Apache Camel 기준으로 파일을 수신하는 방법은

ftp://localhost/orders/example?username=rider&password=secret

이렇게 ftp 컴포넌트를 적고 //로 시작하는 주소와 물음표 뒤에 username과 password를 적는다.


서버를 시작하고, 종료하는 방법은 CMD창에 아래와 같이 입력하면 된다.


FTP 서버 시작

net start filezilla-server


FTP 서버 종료

net stop filezilla-server


728x90

일반 파일복사

import java.io.File;
import java.io.FileInputStream;
import java.io.FileOutputStream;
import java.io.IOException;
import java.io.OutputStream;

public class FileCopier {
	
	public static void main(String args[]) throws Exception {
		File inboxDirectory = new File("data/inbox");
		File outboxDirectory = new File("data/outbox");
		outboxDirectory.mkdir();
		File[] files = inboxDirectory.listFiles();
		for (File source : files) {
			if (source.isFile()) {
				File dest = new File(outboxDirectory.getPath() + File.separator + source.getName());
				copyFile(source, dest);
			}
		}
	}

	private static void copyFile(File source, File dest) throws IOException {
		OutputStream out = new FileOutputStream(dest);
		byte[] buffer = new byte[(int) source.length()];
		FileInputStream in = new FileInputStream(source);
		in.read(buffer);
		try {
			out.write(buffer);
		} finally {
			out.close();
			in.close();
		}
	}
}


You have to use low-level file APIs and ensure that resources get closed properly, a task that can easily go wrong. Also, if you wanted to poll the data/ inbox directory for new files, you’d need to set up a timer and also keep track of which files you’ve already copied. This simple example is getting more complex.


Camel

import java.io.File;
import java.io.FileInputStream;
import java.io.FileOutputStream;
import java.io.IOException;
import java.io.OutputStream;

import org.apache.camel.CamelContext;
import org.apache.camel.builder.RouteBuilder;
import org.apache.camel.impl.DefaultCamelContext;

public class FileCopier {

	public static void main(String args[]) throws Exception {
		CamelContext context = new DefaultCamelContext();
		context.addRoutes(new RouteBuilder() {

			@Override
			public void configure() throws Exception {
				from("file:data/inbox?noop=true").to("file:data/outbox");
			}
		});
		context.start();
		Thread.sleep(10000);
		context.stop();
		context.close();
	}
}


Every Camel application uses a CamelContext that’s subsequently started and then stopped. You also add a sleep method to allow your simple Camel application time to copy the files. What you should really focus on in listing 1.2 is the route B. Routes in Camel are defined in such a way that they flow when read. This route can be read like this: consume messages from file location data/inbox with the noop option set, and send to file location data/outbox. The noop option tells Camel to leave the source file as is. If you didn’t use this option, the file would be moved. Most people who have never seen Camel before will be able to understand what this route does. You may also want to note that, excluding the boilerplate code, you created a file-polling route in just one line of Java code.

728x90

Apache Camel로 메일 보내는 라우터를 샘플로 만들어봤다.


메일을 보내기 위해선 먼저, pom.xml에 메일 보내는 dependency를 추가해야한다.

<!-- spring boot용 camel을 사용하기 위한 디펜던시-->
<dependency>
	<groupId>org.apache.camel.springboot</groupId>
	<artifactId>camel-spring-boot-starter</artifactId>
	<version>${camel.version}</version>
</dependency>

<!-- Mail 컴포넌트 -->
<dependency>
	<groupId>org.apache.camel.springboot</groupId>
	<artifactId>camel-mail-starter</artifactId>
	<version>${camel.version}</version>
	<!-- use the same version as your Camel core version -->
</dependency>


그리고 네이버 메일 설정에서 SMTP 옵션을 허용해야한다.


그리고 설정 밑에 아래와 같은 정보를 참고해서

환경설정에 등록할 아이디, 네이버 비번, SMTP 서버명, SMTP 포트, 보안 연결 SSL 필요 정보
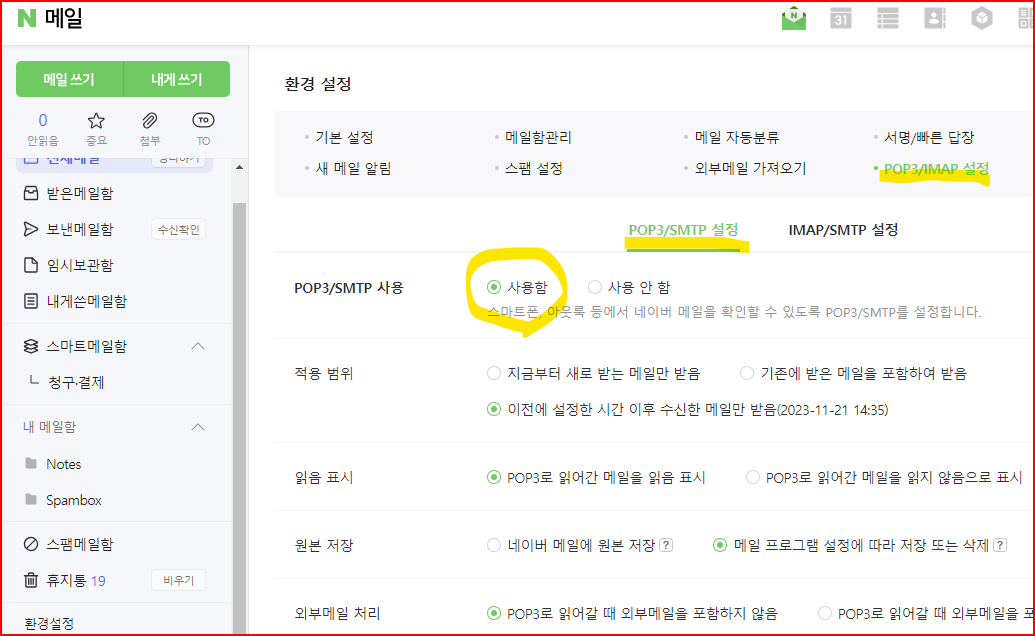
 

application.properties에 정보를 입력해준다.

# 네이버 메일 설정에서 smtp 허용해야함.
spring.mail.host=smtp.naver.com
spring.mail.port=465
spring.mail.properties.mail.smtp.auth=true
spring.mail.properties.mail.smtp.starttls.enable=true

# username은 네이버 로그인할때 아이디@naver.com / password는 네이버 로그인할때 패스워드이다.
spring.mail.username=test@naver.com
spring.mail.password=test


참고로 apache camel은 내부적으로 java mail sender를 사용한다. 그래서 설정값은 거의 java mail sender와 비슷하다.

오류가 나도 mail sender와 똑같은 오류가 난다.


그리고 Camel 라우터를 다음과 같이 만들어 주면 된다.

참고로 프로퍼티 내용은 {{프로퍼티 변수명}} 으로 가져올 수 있다.

여기서 주목해야할 점은 username을 abc@naver.com 이런식으로 이메일 주소를 써야한다는 것이다.

그냥 로그인 아이디만 적으면 RFC? 오류가 난다.

import org.apache.camel.LoggingLevel;
import org.apache.camel.builder.RouteBuilder;
import org.springframework.stereotype.Component;

@Component
public class MailRouter extends RouteBuilder {
	
	@Override
	public void configure() throws Exception {
		
		// 네이버에서 카카오로 보내는 테스트했음, 타이머는 30초로 설정함.
		from("timer:sql-router?period=30000") 
		.routeId("MailRouter")
		// 받는 사람
		.setHeader("from", simple("{{spring.mail.username}}"))
		.setHeader("to", simple("test@kakao.com"))
		.setHeader("subject", simple("NEW TEST MAIL"))
		.setBody(simple("안녕하세요 이건 바디, 메일내용입니다."))
	    
		// application.properties에서 값을 가져와서 세팅한다.
		.to("smtps://{{spring.mail.host}}:{{spring.mail.port}}?username={{spring.mail.username}}&password={{spring.mail.password}}&mail.smtp.auth={{spring.mail.properties.mail.smtp.auth}}&mail.smtp.starttls.enable={{spring.mail.properties.mail.smtp.starttls.enable}}")
		.log(LoggingLevel.INFO,"EMAIL NOTIFICATION SENT");
	}

}


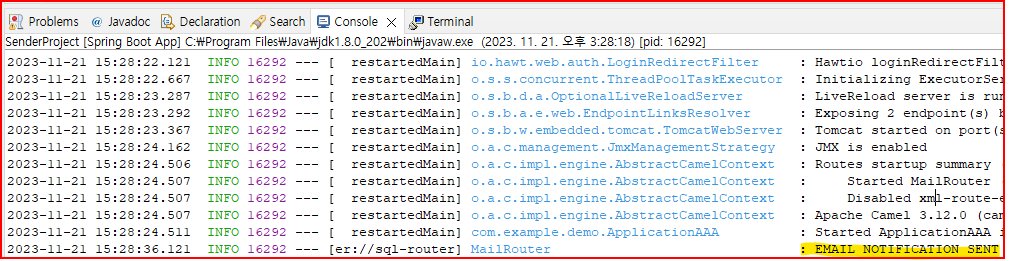
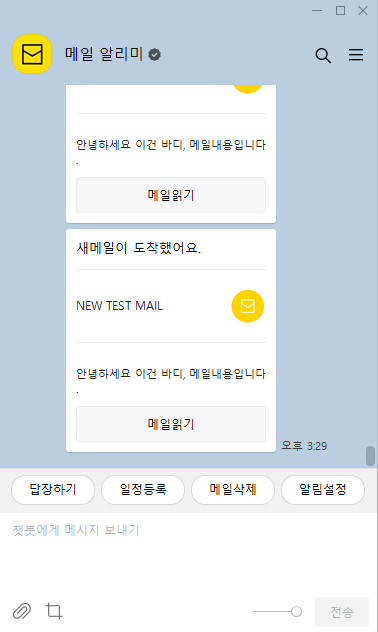
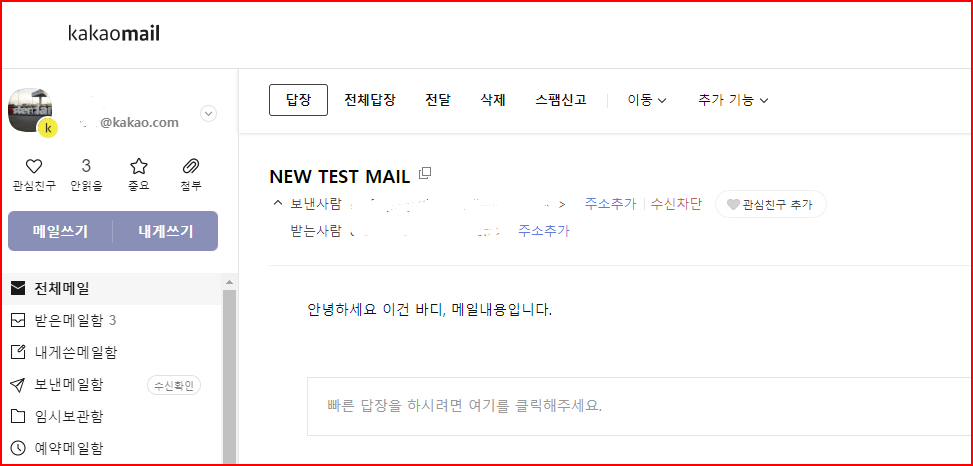
네이버에서 카카오 메일로 성공적으로 보내졌다는 로그
메일보내기 성공

728x90
#!/bin/bash
PID=$(ps -eo pid,comm | awk '$2 == "test-demon.sh" {print $1}')

if [ -z "$PID" ]; then
  echo "... not running"
else
  echo "... running"
  echo ${PID}
fi


결과


728x90
https://www.w3schools.com/xml/xpath_examples.asp


<!DOCTYPE html>
<html>
<body>

<p id="demo"></p>

<script>
var xhttp = new XMLHttpRequest();
xhttp.onreadystatechange = function() {
    if (this.readyState == 4 && this.status == 200) {
        showResult(xhttp.responseXML);
    }
};
xhttp.open("GET", "books.xml", true);
xhttp.send(); 

function showResult(xml) {
    var txt = "";
     path = "//book[@category='web']/year[1]"
    if (xml.evaluate) {
        var nodes = xml.evaluate(path, xml, null, XPathResult.ANY_TYPE, null);
        var result = nodes.iterateNext();
        while (result) {
            txt += result.childNodes[0].nodeValue + "<br>";
            result = nodes.iterateNext();
        } 
    // Code For Internet Explorer
    } else if (window.ActiveXObject || xhttp.responseType == "msxml-document") {
        xml.setProperty("SelectionLanguage", "XPath");
        nodes = xml.selectNodes(path);
        for (i = 0; i < nodes.length; i++) {
            txt += nodes[i].childNodes[0].nodeValue + "<br>";
        }
    }
    console.log(xmlToString(xml)); 
    document.getElementById("demo").innerHTML = txt;
}

 function xmlToString(xmlData) { 

        var xmlString;
        //IE
        if (window.ActiveXObject){
            xmlString = xmlData.xml;
        }
        // code for Mozilla, Firefox, Opera, etc.
        else{
            xmlString = (new XMLSerializer()).serializeToString(xmlData);
        }
        return xmlString;
    }   

</script>

</body>
</html>

+ Recent posts